To activate the integration with Workday, several steps are needed.
1/ Check the qualification section of the Job requisitions
2/ Check the Assessment stage ID
3/ Setup of the assessment statuses
4/ Setup of the AssessFirst assessment category
5/ Setup of the AssessFirst assessments
6/ Creation the AssessFirst user
7/ Creation of a security group
8/ Add the necessary permission for this security group
9/ Creation of the job application integration system
10/ Retrieval of the webservices URL
11/ Creation of a custom report
13/ Optional : Activate Evergreen Requisition
Checks to do to ensure your tenant is compatible with the integration
1/ Check the qualification section of the Job requisitions
Our integration is built around the use of Skills in job requisitions. Therefore, it’s essential to first verify if you have access to the Skills feature when editing a job requisition. Here’s how you can check:
- Go on an open job requisition
- Edit it
- Find the "Skills" section
-png.png?hsLang=en)
If you don't have access to the qualification section of the job requisition, ask your administrator to activate it.
2/ Check the Assessment stage ID
You will need to provide us with the Assessment Stage ID. This refers to the stage in your hiring process where candidates will receive their assessment invitations.
To get this Assessment stage ID, follow these steps:
- In the search bar, search for "Integration IDs"
- Search for "Recruiting stages (Workday owned)"
- Check if the ID of the Assessment stage is "ASSESSMENT"

This ID should be "ASSESSMENT", if it's not the case, just inform us about it.
Actions to set up the integration
3/ Setup of the assessment statuses
We are going to create AssessFirst assessment statuses, so you can be informed of the status of the assessment completion.
To so, follow these steps:
- Go on "Maintain Assessment Statuses"
- Add the 2 statuses: "AssessFirst pending" and "AssessFirst completed"
- For each of them, click on the magnyfing glass (twice)
- Edit their integration IDs to be respectively "assessfirst-pending" and "assessfirst-completed"

4/ Setup of the AssessFirst assessment category
Follow these steps:
- Go on "Maintain Skill Categories"
- Create a category "AssessFirst"

In the “Integration IDs” menu, you will find the category created in the previous step.
Go to AssessFirst → … → Integration IDs → Edit Reference ID.

Update the Reference ID with the value “assessfirst-category”.

You should see the following Skill Category: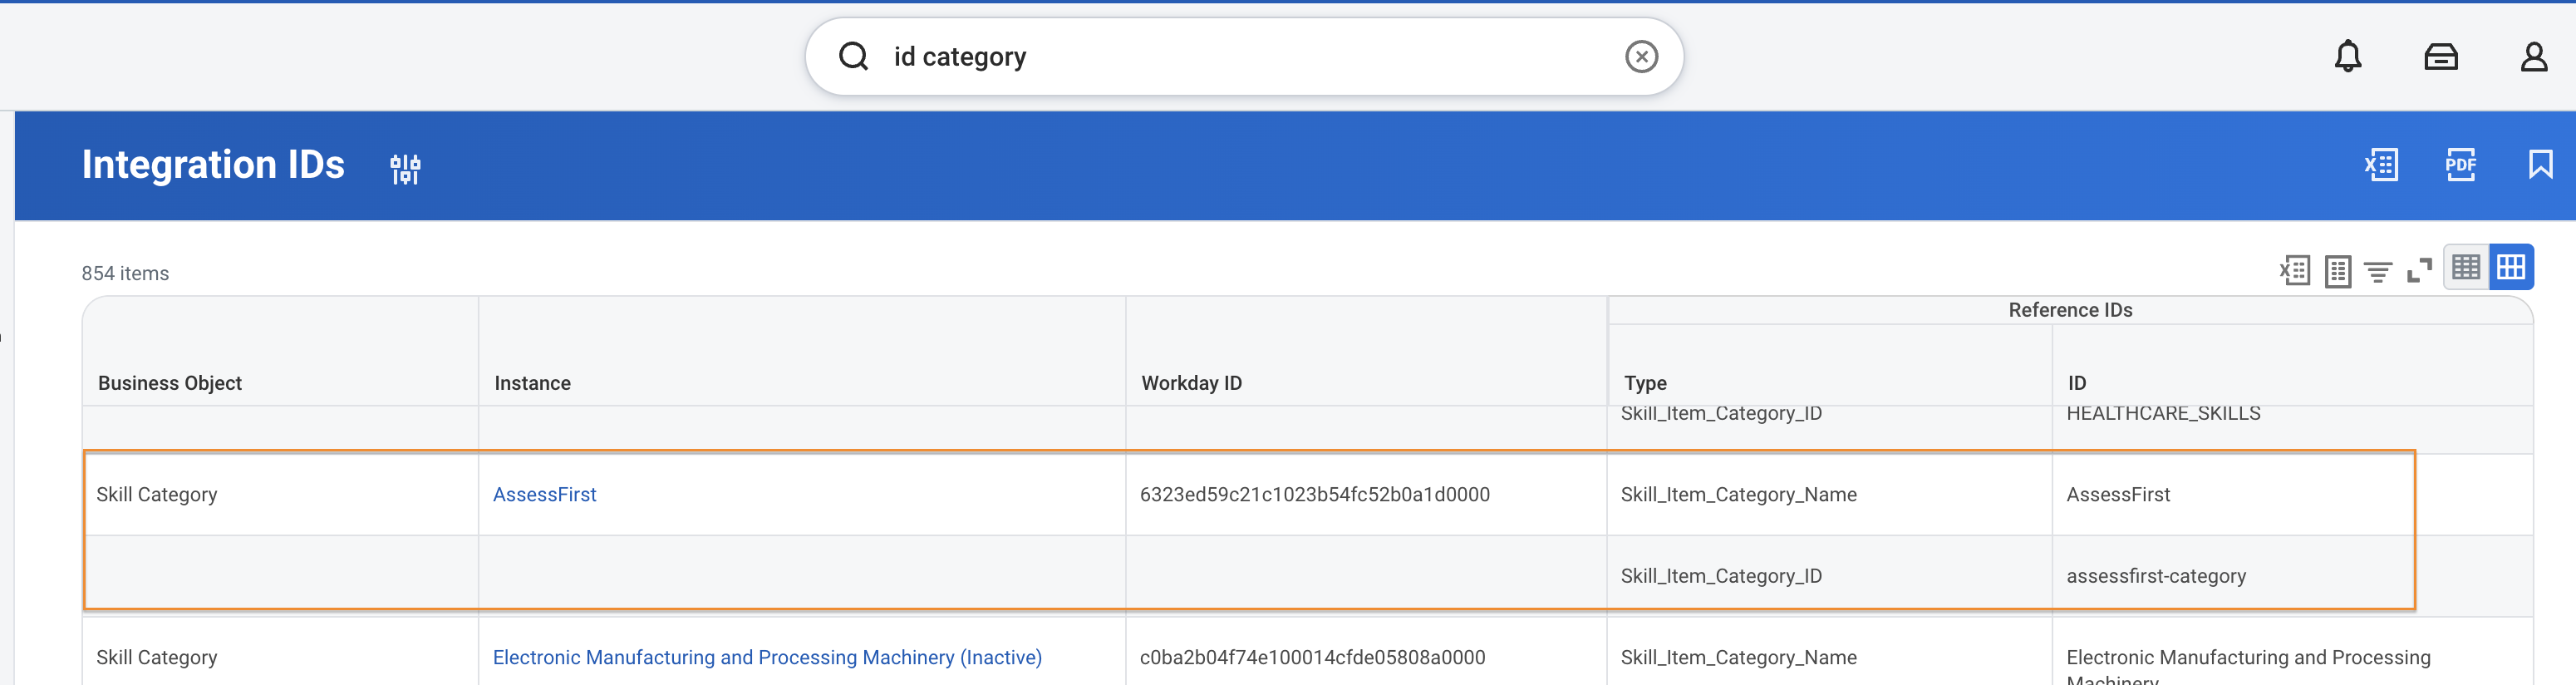
Configure the AssessFirst Assessment Category
Follow these steps:
- Go to “Maintain Recruitment Assessment Categories”.
- Add the “AssessFirst” category with the identifier “assessfirst-category”.

5/ Setup of the AssessFirst assessments
To create the AssessFirst assessments:
- Go on the page "Maintain Recruiting Assessment Tests"
- Create the 4 following tests: "Swipe", "DRIVE", "BRAIN", "GLOBAL ADEQUACY" and "CANDIDATE PROFILE"
- Once created, go on the magnyfing glass (twice) and edit their integration/reference ID with respectively "assessfirst-shape", "assessfirst-drive", "assessfirst-brain", "assessfirst-adequacy" and "assessfirst-candidate"

6/ Creation the AssessFirst user
For us to access the information of your tenant, you will need to create an AssessFirst user which will be able to access the datas about the job requisitions and job applications.
- Go on the page "Create Integration System User"
- Enter the following information:
- Username: "assessfirst-name_of_your_company"
- New password: Any password, you will have to communicate it to us later
-png.png)
7/ Creation of a security group
We will create a security group to give the correct rights to the freshly created user:
- Go on the page "Create security group"
- Enter the following datas:
- Type of Tenanted Security Group : "User-Based Security group"
- Name: "assessfirst-security-group"
-png.png)
8/ Add the necessary permission for this security group
A few authorizationsns need to be added for the integration to work:
- Go on the page "Maintain Permissions for Security Group"
- Select the security group "assessfirst-security-group"
- Add the following permissions (18 in total):
- Get and Put: Candidate Data: Job application
- Get and Put: Candidate Data: Edit Job Application
- Get Only: Indexed Data source: Workers
- Get Only: Job Requisitions for Recruiting
- Get Only: Job Requisition Data
- Get and Put: Staffing Actions: Job Requisition Assessments
- Get and Put: Manage: Candidates
- Get Only: Report Definition Sharing - All Authorized Users
- View and Modifiy: Custom Report Creation
- Get and Put: Set Up: Skills and experience
- Get Only: Worker Data: Employment Data
- Get Only: Person Data: Personal Data
- Get Only: Person Data: Work Email
- Get Only: Worker Data: Current Staffing Information
- Get Only: Worker Data: Workers
- Get Only: Workday Usage Metrics
- Get Only Worker Data; Public Worker Reports
- Get and Put: Candidate Data: Assessment Results
-png.png)
Then activate the security changes on the page "Activate Pending Security Policy Changes"
9/ Creation of the job application integration system
To ensure we are notified when a candidate is moved to the Assessment stage of the hiring process, an integration system needs to be set up. The process is as follows:
- Go on "Create Integration System"
- Create an integration with the following information:
- System name: assessfirst-job-application
- System ID: assessfirst-job-application
- New using template: Subscriber_integration
-png.png)
Then we will need to set up the notifications:
- When on your integration page, click on the 3 dots to edit the integration
- Go on Integration System > Edit Subscriptions
- Select "Subscribe to specific Transaction Types" and add the following transactions: "Assess Candidate - Recruiting Assessment Event", "Interview - Interview", "Job application - Job Application Event", "Refer a Candidate - Referral Event", "Review Candidate - Review Candidate" and "Screen - Screen"
- Enter the following datas:
- Uses API Version: "v38.0"
- Notification URL: "https://app.assessfirst.com/integrations/webhook/workday" (if you are on the testing environment https://simu.assessfirst.com/integrations/webhook/workday)
- Notification User Name: don't matter, add the name of your company
- Notification Password: don't matter
- Validate
-png.png)
6. Add a Workday account to the integration system (the ISU you created)
7. Check if the checkbox "Disable Integration Subscriptions" is unchecked in the page "Edit Tenant Setup - Integrations".
10/ Retrieval of the webservices URL
If you don't know what is the webservices URL of your tenant, you can follow these steps:
- Go on the page "Public Web Services"
- Select the first public webservice
- Click on the 3 dots > Web service > View the WSDL
- Select the URL at the bottom until "service", the URL should be something like: "https://wd2-impl-services1.workday.com/ccx/service"
-png.png)
11/ Creation of a custom report
One of our technical requirements for the integration is to create a custom report. It saves us several calls to the API Workday and avoid the use or recurring tasks to call Workday servers.
To do so follow these steps:
- Go on the page "Create custom report"
- Enter the following information:
- Report Name: assessfirst-report
- Report Type: Simple
- Data Source: Job Applications
-png.png) Then we will need to configure it:
Then we will need to configure it:
- Add the following values in Column:
- Job Requisition
- Job Application Event
- Candidate Stage
- First Name
- Last Name
- Primary Recruiters or Recruiters
- In the filter part add the condition:
- Candidate Stage / in the selection list / Assessment
Then check the webservice URL of this custom report:
- In the top menu click on "Custom report">"Webservice">"View URLs"
- Click on the RSS link
- Check if the URL of the webservice starts like the webservice URL previously retrieved
-png.png)
To finish, you will have to transfer the ownership of the custom report to our AssessFirst ISU, so we can access it:
- In the top menu click on "Custom report">"Transfer ownership"
- Transfer ownership to the created integration user
-png.png)
12/ Activate your integration
1. Retrieve the login/password of the created user, the tenant ID of your company and the webservice URL retrieved in the step just before.
If you are an Administrator and you have an API license, you can now activate Workday directly from the AssessFirst platform by following this procedure:
1. Click on the icon at the top right to access your settings and select Integrations
2. Click on Workday
3. Enter the 4 pieces of information retrieved earlier:
- Login of the ISU you created for us
- Password of the ISU
- Webservice URL
- Tenant ID
- Status : By default, invitations are automatically triggered when the status changes to ASSESSMENT. If you want to keep this behavior, you can leave the field empty. Otherwise, you can enter the name of the status you want to use to trigger the invitation.
-png-1.png)
13/ Optional : Activate Evergreen Requisition
If you are using an Evergreen Requisition, please add the following configuration.- Launch
Create Calculated Field. - Field Name: e.g.
Is_Evergreen(Important to keep the exact same name). - Business Object:
Job Application(your PBO, not Job Requisition this time). - Function:
Lookup Related Value. - On the Calculation tab:
- Lookup Field: select the
Job Requisitionrelationship (the single-instance link from Job Application to the requisition). - Return Value: select your
Evergreencalculated field (the one set on Job Requisition).
- Lookup Field: select the
- Click OK.

Then, add the calculated field in your custom report

To learn how to use integration with Workday, click here.
- .